“What are Barrre chords?” you might ask. Well, I’m glad you did ’cause they’re my favorite!
Barre is a type of guitar chord that requires you to use a finger as a “bar” to fret more than one note on a single string. They’re used in many popular songs, like “Let It Go” from Frozen, “Barbie Girl” by Aqua, and “Heart and Soul” by Hoagy Carmichael.
You can also use them in your own songs to add some spice. So let’s look at how to do that!
What Are These Barre Chords Everyone’s Talking About?
The Basics
Barre chords are like the chameleons of the guitar world – they can change their shape to fit any chord you need! All you need to know is the fingering of four chords: E major, E minor, A major, and A minor. The root notes of the E chords are on the sixth string, while the root notes of the A chords are on the fifth string.
Let’s Get Visual
To help explain this better, let’s look at some images. Imagine you’re a master copywriter and you can move your hand around the guitar neck to create any chord you need. It’s like magic!
The Bottom Line
So, to sum it up, barre chords are like shape-shifters – they can take on any form you need. All you need to know is the fingering of four chords: E major, E minor, A major, and A minor. With the help of some images, you can be a master copywriter in no time!
Guitar Chords: Barre Chords Explained
What are Barre Chords?
Barre chords are a type of guitar chord that involve pressing down all the strings of the guitar at once. This is done by placing the index finger across the strings at a certain fret, and then pressing down with the other fingers to form the chord. This technique is used to play chords in higher positions, as it allows for chords that would otherwise be too difficult to reach in open position.
How to Play Barre Chords
Barre chords can be divided into two main shapes: E-type and A-type.
- E-type Barre Chords – This shape is based on the E chord shape (022100) and is moved up and down the frets. For example, the E chord barred one fret up becomes an F chord (133211). The next fret up is F♯, followed by G, A♭, A, B♭, B, C, C♯, D, E♭, and then back to E (1 octave up) at fret twelve.
- A-type Barre Chords – This shape is based on the A chord shape (X02220) and is moved up and down the frets. To barre the A chord shape, the guitarist puts the index finger across the top five strings, usually touching the 6th string (E) to mute it. They then barre either the ring or little finger across the 2nd (B), 3rd (G), and 4th (D) strings two frets down, or one finger frets each string. For instance, barred at the second fret, the A chord becomes B (X24442). From fret one to twelve, the barred A becomes B♭, B, C, C♯, D, E♭, E, F, F♯, G, A♭, and at the twelfth fret (that is, one octave up), it is A again.
Variations of Barre Chords
You can also play variations of these two chords, such as dominant 7ths, minors, minor 7ths, etc. Minor barre chords include a minor third in the chord rather than the major third (in “E” and “A” shaped barre chords, this note happens to be the highest ‘non-barred’ note).
In addition to the two common shapes above, barre/movable chords can also be built on any chord fingering, provided that the shape leaves the first finger free to create the barre, and that the chord does not require the fingers to extend beyond a four fret range.
The CAGED System
The CAGED system is an acronym for the chords C, A, G, E, and D. This acronym is shorthand for the use of barre chords that can be played anywhere on the fret board as described above. Some guitar instructors use it to teach students the open chords that can work as barre chords across the fret board. By replacing the nut with a full barre, a player can use the chord shapes for C, A, G, E, and D anywhere on the fret board.
The Struggle is Real: Bar Chords
The Problem
Ah, bar chords. The bane of every beginner guitarist’s existence. It’s like trying to hold down a wild octopus with one hand. You know you have to do it, but it’s just so darn hard!
- You’ve got to hold down all six strings with one finger.
- You try your best, but the chords sound muddy and muted.
- You get frustrated and want to give up.
The Solution
No need to throw in the towel just yet! Here’s a tip: Start slow and build up your finger strength. Once you’ve got that down, you can move on to bar chords. It might take some time, but it’s worth it.
- Take your time and build up your finger strength.
- Don’t rush into bar chords.
- Practice makes perfect!
What Are Partial Barre Chords?
The Great Barre Chord
If you’re looking to take your guitar playing to the next level, you’ll want to learn the art of the great barre chord. This full barre chord is a bit more complicated than the small barre chord, but it’s worth the effort! Here’s what it looks like:
- E————-1—————1—
- B————-1—————1—
- G————-2—————2—
- D————-3—————3—
- A————-3——————-
- E————-1——————-
The Small Barre Chord
The small barre chord is a great starting point for any aspiring guitarist. It’s much easier to play than the great barre chord, and it’s a great way to get your fingers used to the fretboard. Here’s what it looks like:
- E————-1—————1—
- B————-1—————1—
- G————-2—————2—
- D————-3—————3—
- A————-3——————-
- E————-1——————-
Gm7 Chord
The Gm7 chord is a great way to add some flavor to your playing. It’s a bit more complicated than the other chords, but it’s worth the effort! Here’s what it looks like:
- G——3——3——3——3——
- D——5——5————-3——
- A——5—————————
This “simplified version” on the upper three strings is great for soloing, and you can use any of your first three fingers to play it. You can also consider the Gm7 a B♭add6 if you want to get fancy.
What’s a Diagonal Barre Chord?
What it is
Ever heard of a diagonal barre chord? Don’t worry, you’re not alone. It’s a pretty rare chord that involves the first finger barring a couple of strings on different frets.
How to Play
Ready to give it a go? Here’s how you can play a diagonal barre chord:
- Put your first finger on the second fret of the first string and the third fret of the sixth string.
- Strum away and you’ve got yourself a major seventh chord on G.
The Lowdown
So there you have it – the mysterious diagonal barre chord. Now you can impress your friends with your new-found knowledge. Or you can just keep it to yourself and enjoy the sweet sound of a major seventh chord on G.
Understanding Barre Chord Notation
What is Barre Chord Notation?
Barre chord notation is a way of indicating which strings and frets should be held down when playing a guitar. It’s usually written as a letter (B or C) followed by a number or Roman numeral. For example: BIII, CVII, B2, C7.
What Do the Letters Mean?
The letters B and C stand for barre and cejillo (or capotasto). These are terms used to describe the technique of pressing down multiple strings at once.
What About Partial Barres?
Partial barres are indicated differently depending on the notation style. A vertical strike-through of the letter “C” is a common way of indicating a partial barre. Other styles may use superscript fractions (e.g., 4/6, 1/2) to indicate the number of strings to barre.
What About Classical Music?
In classical music, barre chord notation is written as Roman numerals with indices (e.g., VII4). This indicates the fret and number of strings to barre (from the highest-tuned downwards).
Wrapping Up
So there you have it – barre chord notation in a nutshell! Now you know how to read and interpret the various symbols and numbers used to indicate barre chords. So go ahead and start strumming those strings!
Learning the Basics of Barre Chords on the Guitar
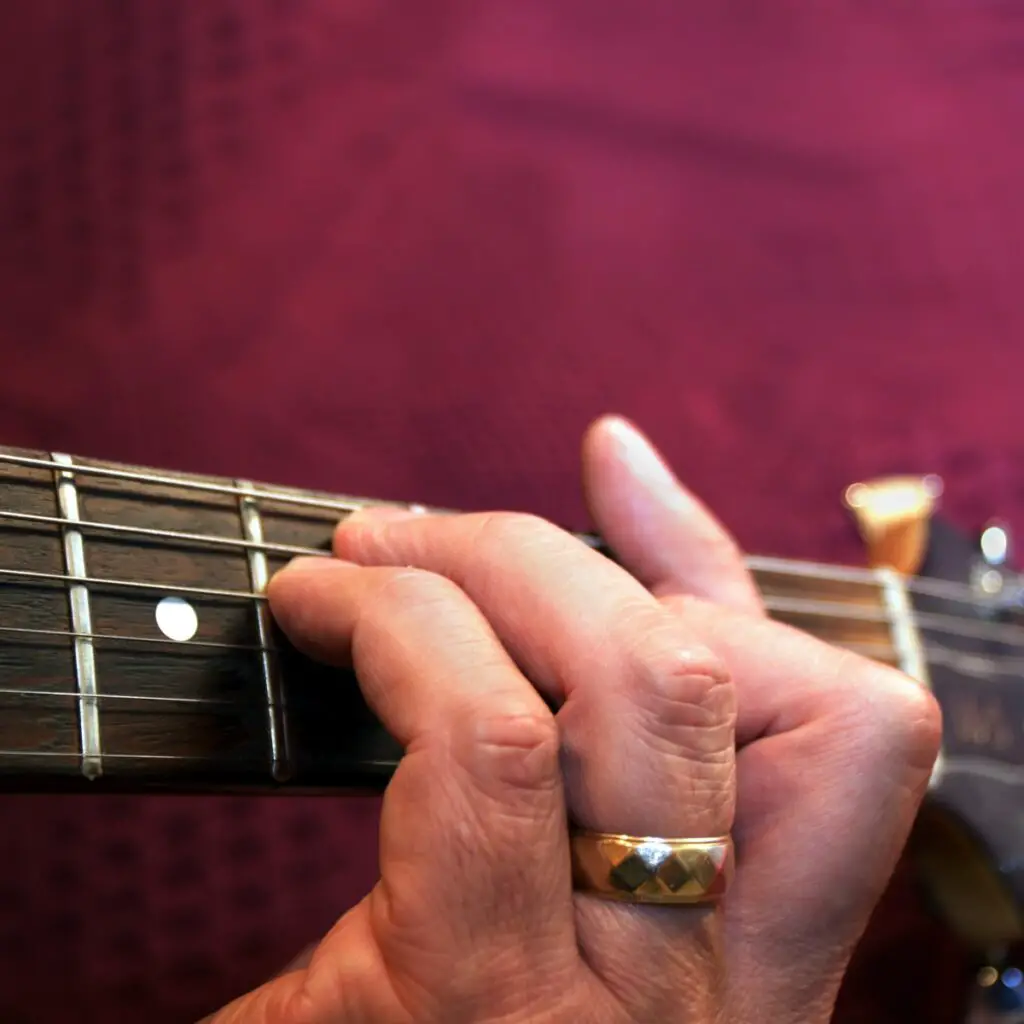
Getting Started with the Index Finger
So you want to learn how to play barre chords on the guitar? Well, you’ve come to the right place! The first step is to get your index finger in shape. This might seem like a daunting task, but don’t worry – with a bit of practice, you’ll be playing like a pro in no time.
Here’s what you need to do:
- Head to the third fret and place your index finger across all six strings. This is what’s known as the “bar”.
- Strum the strings and make sure you’re getting a clean sound across all six strings. If not, try playing the strings individually to see which ones aren’t getting proper coverage.
- Keep the strings pressed tightly so that they can vibrate properly when you strum.
Practice Makes Perfect
Once you’ve got the basics down, it’s time to start practicing. Don’t worry if you don’t get it right away – it takes time and patience to master barre chords. So take your time, keep practicing, and soon enough you’ll be playing like a pro!
Barre Chords: Get Ready to Rock
Getting a Grip on Barre Chords
When it comes to mastering barre chords, it’s all about practice. But, don’t worry, we’ve got some tips to make it easier and faster.
First, you need to understand how your hand needs to grip the neck. It’s a bit different than when you’re playing basic chords or single note lines. The best way is to place your thumb a bit lower on the back of the neck. This will give you the leverage you need to barre properly.
One Finger at a Time
When you’re first learning these patterns, take your time to make sure your fingers are in the right place. Just like when you’re fretting single strings, your barre finger (most likely your index finger) should be slightly behind the frets, not on top of them. Play each note individually to make sure it’s ringing out loud and clear.
The Right Amount of Pressure
A common mistake beginners make when learning barre chords is using the wrong amount of finger pressure. Too much pressure can make the notes sound sharp, and it’ll tire out your hands and forearm. Too little pressure will mute the strings so they won’t ring out at all. Once you get the hang of it, you can use this technique to add some flair to your playing.
Shift It Up
To really help you learn barre chords, try shifting between different positions. Use one finger pattern and move it around the neck. Or, practice changing positions and fingering patterns at the same time. For example, you could play a major C chord on the 3rd fret of the A string, then switch to a major F chord with the root on the 1st fret of the low E string, and finally slide up to a major G chord with the root on the 3rd fret of the low E.
Make it Fun
When you’re dealing with the technical stuff, it can get boring. So, make your practice fun. Take a song you know with open chords and learn how to play it with barre chords. It’s a great way to learn a new technique and keep things interesting.
Raise the Barre
Barre chords can be difficult to learn, but if you put in the effort, you’ll be able to tackle all sorts of new songs and playing styles. Keep the end goal in mind and remember, no pain, no gain. Here are a few points to keep in mind when learning barre chords:
- Make sure your index finger is in the right place over all the strings.
- Place your thumb a bit lower on the back of the neck.
- Apply the right amount of pressure on the strings. Too much and they’ll sound sharp, too little and they’ll be muted.
- Play the strings after fingering the chord.
Once you’ve got bar chords down, you’ll be able to open up your playing to a whole new world. So, get ready to rock!
Conclusion
Barre chords are a great way to add some variety to your guitar playing. With a little practice, you’ll be able to master these chords and use them to create some truly unique sounds. Just remember to keep your fingering clean and precise, and you’ll be playing like a PRO in no time!

I'm Joost Nusselder, the founder of Neaera and a content marketer, dad, and love trying out new equipment with guitar at the heart of my passion, and together with my team, I've been creating in-depth blog articles since 2020 to help loyal readers with recording and guitar tips.